Ollama Kubernetes Deployment: Cost-Effective and Secure
The AI open-source solutions are making their mark, challenging the dominance of closed models. Meta’s Llama family of models, an open-source powerhouse, has experienced a surge in adoption, with large enterprises like AT&T, Zoom, and Spotify utilizing these models for internal and external use cases. With downloads skyrocketing, it is clear that open-source AI matches closed models in performance and offers cost-effective and innovative solutions that enterprises quickly embrace.
Ollama is an open-source AI tool that enables users to run small and large language models (SLMs and LLMs) directly on their local machines. You can download models like Llama, Mistral, Gemma, and others from Ollama’s model library. Ollama allows researchers, developers, and AI enthusiasts to work with powerful AI models without relying on cloud-based infrastructure by providing a platform that simplifies downloading, installing and accessing models.
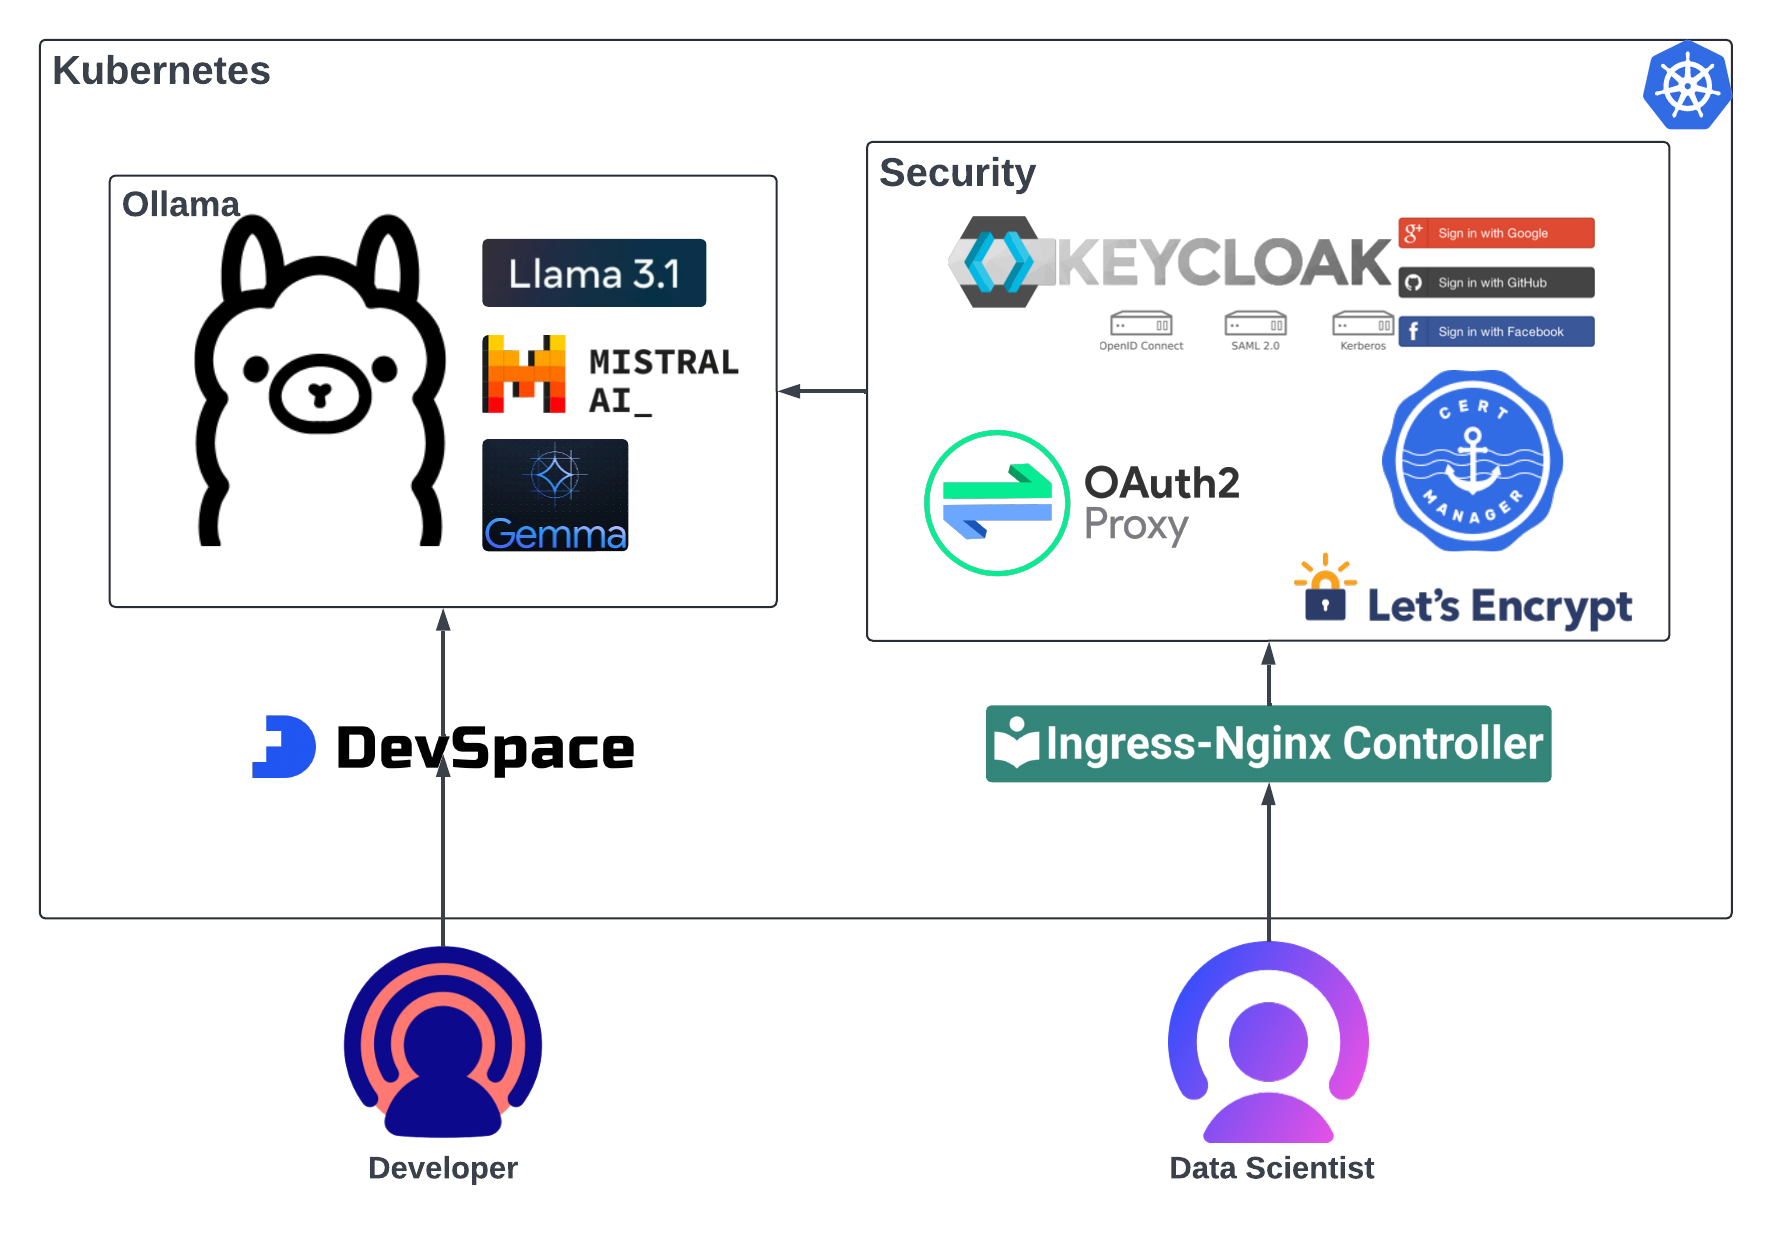
As more organizations look to harness the power of AI while keeping costs in check, deploying Ollama models into Kubernetes clusters is an excellent solution. Ollama, which requires GPU support to run LLMs efficiently, can be deployed cost-effectively and securely using Terraform, Terragrunt, and Kubernetes tooling. This blog will walk you through the steps of setting up a GPU-enabled node pool in GKE, deploying the Ollama Helm chart securely with OAuth2 and Keycloak integration, and presenting two real-world use cases: a secure notebook access for quick prototyping and a dev-focused deployment leveraging DevSpace and LangChain.
The code for this blog is available here.
Kubernetes Node Pool with GPU Support
We recommend adding a new node pool with GPU support to your Kubernetes cluster or creating a new cluster with GPU support to ensure a cost-effective and scalable approach. Node pools offer a flexible and efficient way to manage workloads by allowing you to match resources precisely to your application needs, optimizing both performance and cost.
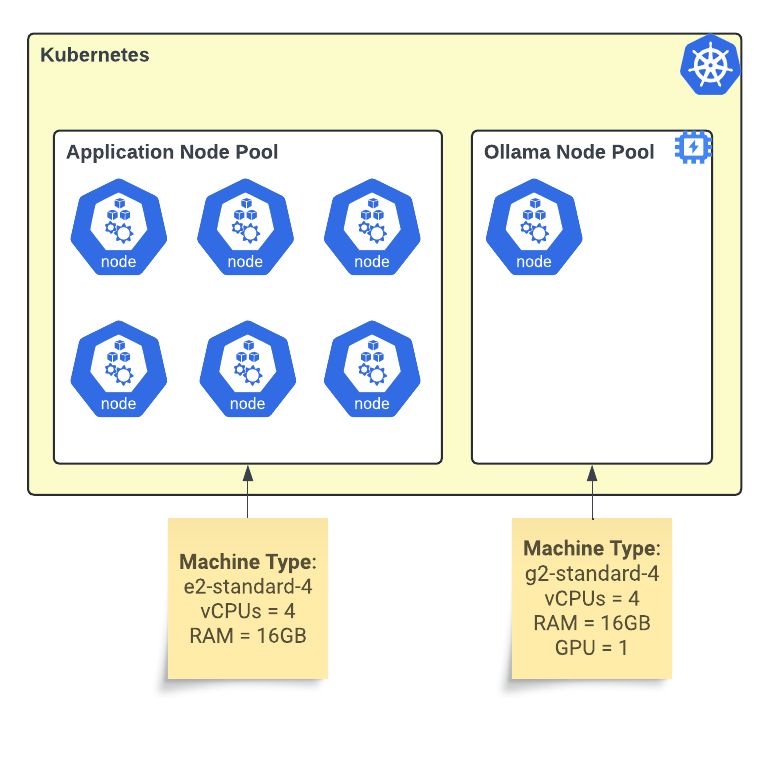
A Kubernetes GPU node pool setup optimized for deploying Ollama models, enhancing AI model performance through scalable GPU resources.
In Kubernetes, a node pool is a group of nodes with the same machine type and configuration, tailored to specific resource needs for optimal performance and cost efficiency. Node pools offer several benefits, including workload segmentation and scaling flexibility.
Adding a new node pool with GPU support and autoscaling enabled from 0 to 1 nodes allows you to add GPU functionality to an existing cluster and limit the cost. The autoscaler reduces the pool to zero nodes with no GPU workloads. Initially, the limit of 1 node will prevent the experiment cost from getting out of hand. When the experiment ends, you simply teardown or delete the node pool without impacting the rest of the cluster.
Terraform for Node Pool
We deploy our clusters with IaC. Here is a fragment of the Terragrunt HCL file used to deploy our dev GKE cluster with the GKE Node Pool Terraform module from Google’s cloud foundation fabric.
terragrunt.hcl
# Node pools
node_pools = {
   "tc-tekstack-kps-common-np" = {
     gke_version        = "1.29.7-gke.1104000"
     machine_type       = "e2-standard-4"
     disk_size_gb       = "100"
     disk_type          = "pd-standard"
     image_type         = "UBUNTU_CONTAINERD"
     preemptible        = true
     initial_node_count = 3
     min_node_count     = 1
     max_node_count     = 16
     node_selector      = {"node"="common"}
     node_locations     = [local.zone1,local.zone2]
   }
   "tc-tekstack-kps-gpu-np" = {
     gke_version        = "1.29.7-gke.1104000"
     machine_type       = "g2-standard-4"
     disk_size_gb       = "100"
     disk_type          = "pd-balanced"
     image_type         = "UBUNTU_CONTAINERD"
     node_selector      = {"node"="gpu"}
     node_locations     = [local.zone1]
     preemptible        = false
     spot               = true
     initial_node_count = 1
     min_node_count     = 0
     max_node_count     = 1
     location_policy = "ANY"
     guest_accelerator = {
       type = "nvidia-l4"
       count = 1
       gpu_driver = {
         version = "DEFAULT"
       }
       gpu_sharing_config = {
         gpu_sharing_strategy = "TIME_SHARING"
         max_shared_clients_per_gpu =
       }
     }
   }
 }
Infrastructure cost-relevant properties are the preemptible, spot, node counts, and GPU sharing. For the GPU node pool, we use Spot VMs. Spot VMs are affordable compute instances that offer the same machine types, options, and performance as regular compute instances.
“Spot VMs are up to 91% cheaper than regular instances. You get pricing stability with no more than once-a-month pricing changes and at least a 60% off guarantee.” – Google Cloud.
We make the GPU node pool auto-scalable, with zero minimum and one maximum node. These limits allow us to work safely, knowing that the nodes’ scaling will not get out of control and cap the infrastructure prices.
We use Google Cloud’s GPU time-sharing feature to optimize the cost further. GPU time-sharing allows multiple workloads to share access to a single NVIDIA GPU hardware accelerator.
Ollama Helm Deployment
Several Ollama Helm charts are available at Artifact HUB. We chose the most popular one from the OWTLD crew. We deploy the Helm chart with Terraform Helm provider using our standard Terragrunt project.
.
├── environments
│   ├── env.hcl
│   ├── prod
│   │   └── terragrunt.hcl
│   └── terragrunt.hcl
└── infra
    ├── README.md
    ├── data.tf
    ├── main.tf
    ├── outputs.tf
    ├── values.yaml
    └── variables.tf
The complete code is available in the git for review.
Helm values
We made several adjustments to the deployment, starting with enabling GPU in the values YAML:
# Ollama parameters
ollama:
  gpu:
    # -- Enable GPU integration
    enabled: true
    # -- GPU type: 'nvidia' or 'amd'
    type: 'nvidia'
    # -- Specify the number of GPU
    number: 1
    nvidiaResource: "nvidia.com/gpu"
  # -- Override ollama-data volume mount path, default: "/root/.ollama"
  mountPath: "/data/.ollama"
# Additional env vars
extraEnv:
  - name: HOME
    value: "/data"
After changing the mount path from the root directory, we set a new home directory. The extra env sets the home directory that points to the volume directory.
Note: The Ollama Go code uses “home, err := os.UserHomeDir()” and expects the user’s home directory.
Since running pods and containers as root is a bad practice, we update the security context.
# -- Pod Security Context
podSecurityContext:
  fsGroup: 10001
# -- Container Security Context
securityContext:
  capabilities:
    drop:
      - ALL
  readOnlyRootFilesystem: false
  runAsNonRoot: true
  runAsUser: 10001
  runAsGroup: 10001
Another necessary change is the node selector.
nodeSelector:
  node: "gpu"
In the Terragrunt node pool configuration, we set the node label. Then, we configure the node selector to match that label, ensuring the system deploys the pods to the corresponding nodes.
Terraform
We further set Helm properties in the Terraform Helm release resource.
main.tf
// Set storage configuration
set {
  name  = "persistentVolume.storageClass"
  value = data.terraform_remote_state.gke_man.outputs.storageclass_standard_retain_wait
}
set {
  name  = "persistentVolume.size"
  value = var.storage_size
}
We have predefined StorageClasses, which are maintained in another IaC project. For Ollama type of deployments, we choose a StorageClass with the volume binding mode of WaitForFirstConsumer, which will delay the binding and provisioning of a PersistentVolume until a Pod using the PersistentVolumeClaim is created. Additionally, this StorageClass has the reclaim policy set to Retain so that the PersistentVolume is not deleted when the PersistentVolumeClaim is deleted.
We go all out with the volume size and set it to 2 terabytes. We expect to download many different Ollama models for testing. We continue adjusting other properties, including initial models, ingress and resources.
timeout          = 600 # 10 minutes, wait for post start hook to download models
values = [
    "${file("values.yaml")}",
    yamlencode({resources=local.resources_for_yaml}),
    yamlencode({ollama={models=var.models}}),
    local.ingress
  ]
We initially set the models to only one, LLama3.1, to control the deployment. Post-start deployment life cycle executes the Ollama model pull command, which might take many minutes. Setting the initial models list and the Helm timeout to 10 minutes will allow the model to be downloaded and the Helm install to complete. The other configurations in the values list are ingress and resources. We initially turned off the ingress while configuring the domain and making an output to be used by the OAuth2 proxy Terraform.
terragrunt.hcl
# Ollama ingress
ollama_domain = "my-fancy.domain.com"
enable_ingress = false # Default if false, enable it after oauth2-proxy is deployed.

main.tf
  // Define ingress configuration for YAML
  ingress = <<EOF
ingress:
  enabled: ${var.enable_ingress}
...

outputs.tf
output "ollama_ingress_hostname" {
  value       = var.ollama_domain
  description = "Ollama ingress hostname"
}
Once the OAuth2 Proxy is deployed, we will enable the ingress and reploy the Helm chart.
The other necessary configuration in the values list is the pod resources configuration.
terragrunt.hcl
# Ollama resources config
resources = {
  requests = {
    cpu = "1"
    memory = "8Gi"
    nvidia_gpu = "1"
  }
  limits = {
    cpu = "2"
    memory = "10Gi"
    nvidia_gpu = "1"
  }
}

main.tf
// Define resource requests and limits for YAML configuration
resources_for_yaml = {
  requests = {
    cpu         = var.resources.requests.cpu
    memory      = var.resources.requests.memory
    "nvidia.com/gpu" = lookup(var.resources.requests, "nvidia_gpu", null)
  }
  limits = {
    cpu         = var.resources.limits.cpu
    memory      = var.resources.limits.memory
    "nvidia.com/gpu" = lookup(var.resources.limits, "nvidia_gpu", null)
  }
}
We request a GPU for the pod’s container. The funny business with “nvidia_gpu” and “nvidia.com/gpu” is that the / is not allowed in the HCL map key.
Downloading Models
After the initial deployment, we need to be able to download additional Ollama models.
module "download_llms" {
  depends_on             = [ helm_release.ollama ]
  source                 = "../../../../../../modules/kubectl_wrapper"
  cluster_name           = data.google_container_cluster.cluster.name
  cluster_ca_certificate = data.google_container_cluster.cluster.master_auth[0].cluster_ca_certificate
  kube_host              = "https://${data.google_container_cluster.cluster.private_cluster_config[0].private_endpoint}"
  # Control variable to decide when to download models
  always_apply           = var.execute_download
  # Use the additional_models variable directly in the command
  command = <<EOT
  kubectl exec -n ${local.namespace} $(kubectl get pods -n ${local.namespace} -l app.kubernetes.io/name=${var.deployment_fullname} -o jsonpath="{.items[0].metadata.name}") -c ${var.chart_name} -- /bin/sh -c 'echo ${join(" ", var.additional_models)} | xargs -n1 /bin/ollama pull' > /tmp/ollama_pull.log 2>&1
  EOT
}
This module, download_llms, is responsible for downloading additional Ollama models after the initial Helm chart deployment. The process would take too long if it included the model downloads, so this module provides more control, particularly in a GitOps environment where tracking model deployments is essential. When a model is needed, we update the additional_models variable, enable the module, make a pull request, and apply the Terraform. To support different use cases, we have pulled various models.
terragrunt.hcl
# Ollama models
models = [
  "llama3.1:8b", # 4.7GB
]

additional_models = [
  "llama3.1:405b", # 229GB
  "codegemma", # 5.0GB
  "gemma2:27b", # 16GB
  "phi3:14b", # 7.9GB
  "qwen2:7b", # 4.4GB
  "qwen2:72b", # 41GB
  "mistral-large", # 69GB
  "deepseek-coder-v2:236b", # 133GB
]
Security Setup with OAuth2 Proxy and Keycloak
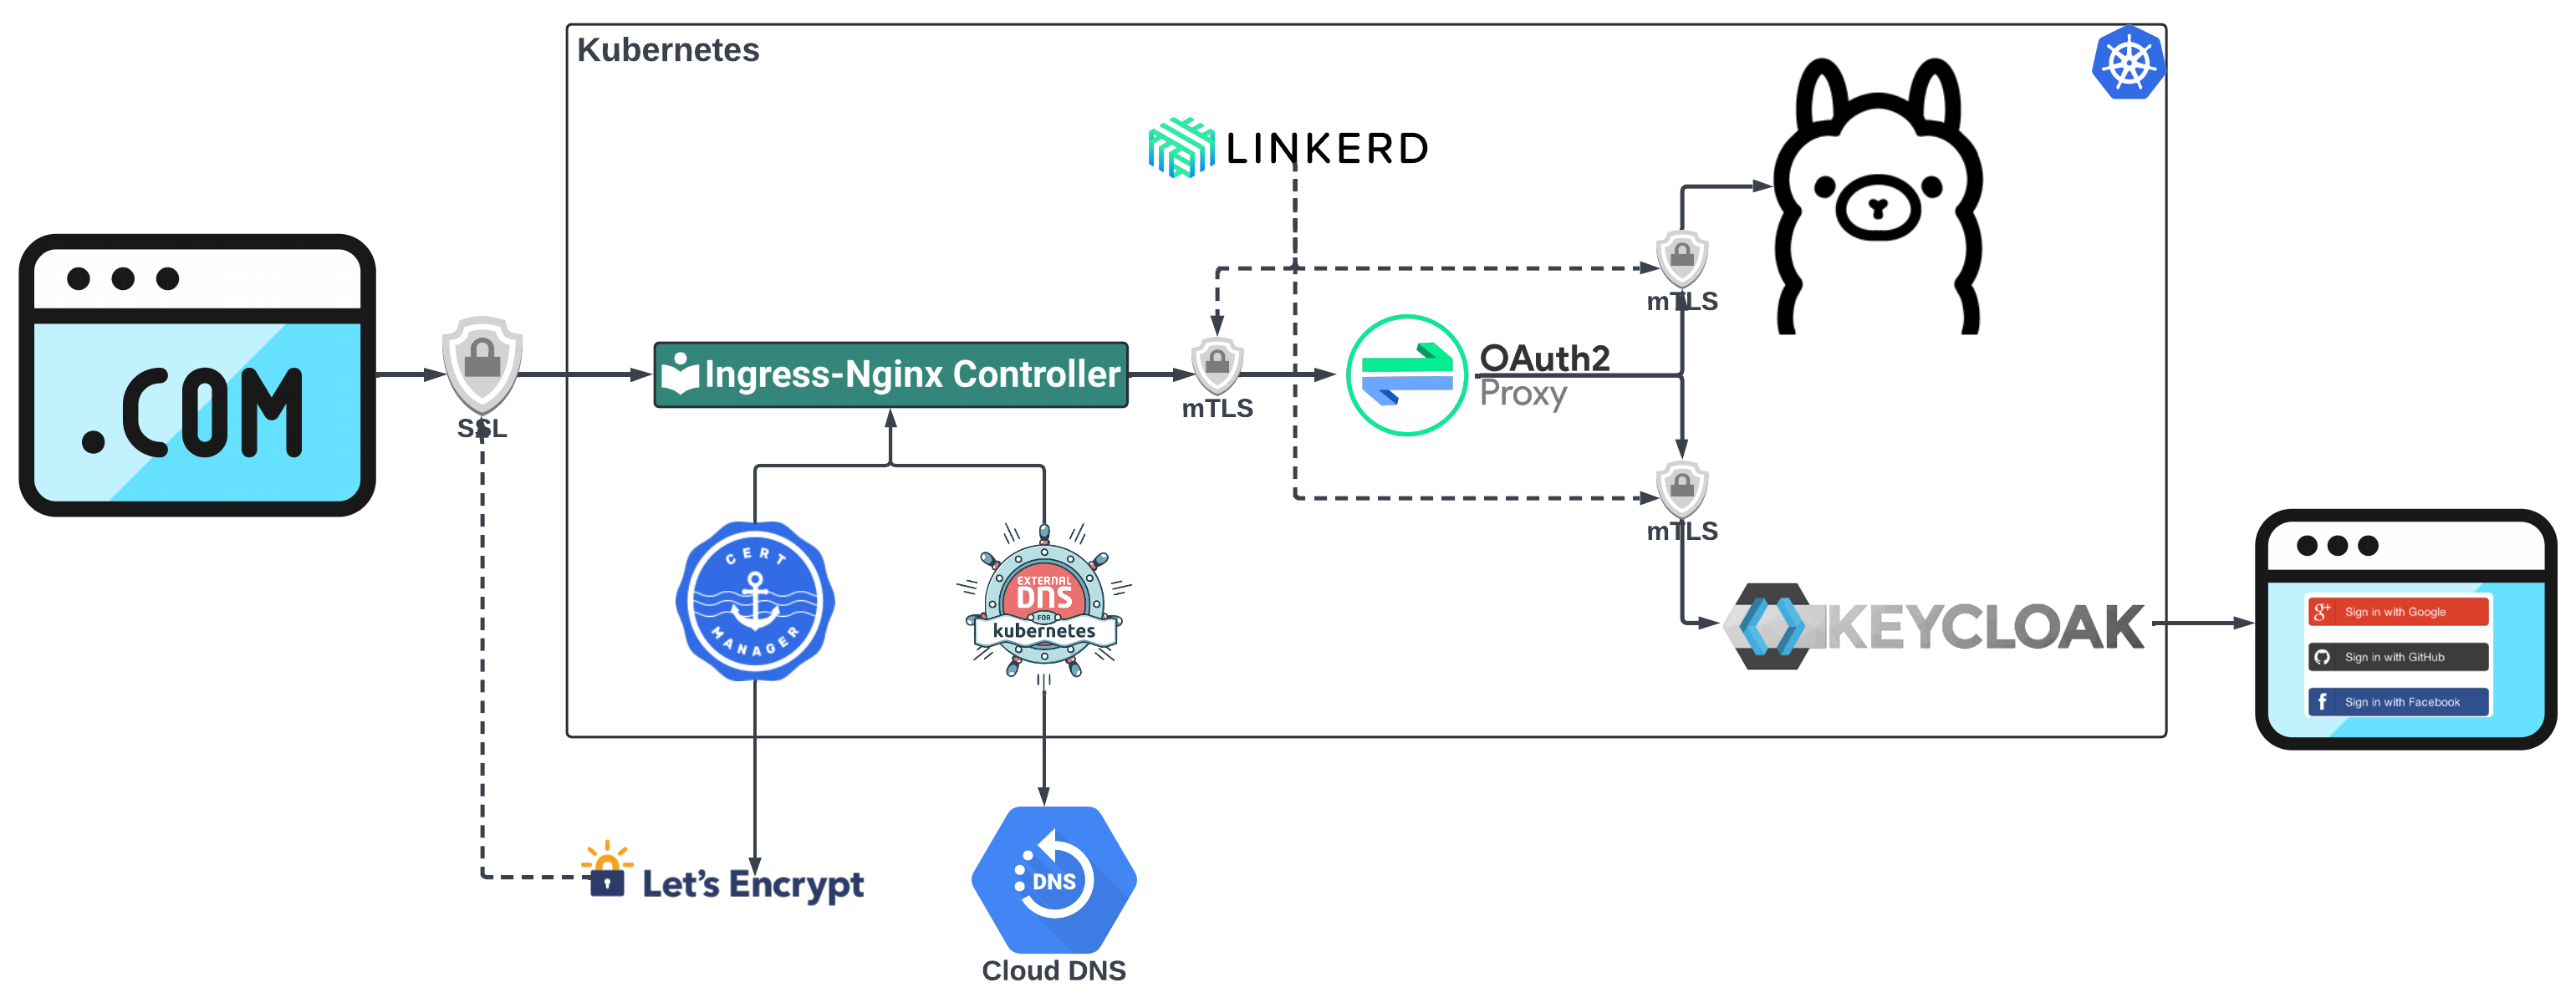
To ensure secure access to the Ollama deployment, we utilize a robust authentication flow that combines OAuth2 Proxy with Keycloak, along with cert-manager, External DNS, Ingress NGINX Controller, and Linkerd, providing comprehensive security and user authentication.
To ensure secure access to the Ollama deployment, we utilize a robust authentication flow that combines OAuth2 Proxy with Keycloak, with additional including cert-manager, External DNS, Ingress NGINX Controller, and Linkerd. This setup provides flexible, centralized user authentication, enabling users to log in using third-party providers like Google, GitHub, or Facebook. By integrating OAuth2 Proxy and Keycloak, we add a layer of protection to the Ollama service, ensuring that only authenticated and authorized users can access it. The diagram illustrates how the components work together to secure the Ollama deployment.
- Cert Manager with Let’s Encrypt automates the management of TLS certificates to ensure encrypted communication between users and the Ingress service.
- Cloud DNS with External DNS automatically creates DNS records, allowing users to access the Ollama deployment using a friendly domain name.
- The Ingress NGINX Controller is responsible for SSL termination. It decrypts incoming HTTPS requests before forwarding them to the internal services.
- Linkerd is a service mesh responsible for mTLS between Kubernetes services. It encrypts the communication between services within the cluster.
- OAuth2 Proxy secures access to the Ollama service by checking for authentication cookies. If no secure cookie is present, OAuth2 Proxy initiates an authentication flow. It forwards the user to Keycloak.
- Keycloak acts as the identity broker, providing centralized user authentication. It integrates with external identity providers like Google, GitHub, or Facebook, allowing users to log in using their existing credentials. Once the user successfully logs in, Keycloak provides OAuth2 Proxy with the necessary tokens, allowing secure access to Ollama.
The repo provides the OAuth2 Proxy Terraform deployment. Let’s review the ingress configuration required for the proxy and Ollama deployments. Here is the Ingress configuration for the Oauth2 Proxy:
ingress:
  path: /${var.oauth2_url_prefix_ol}
  pathType: Prefix
  hosts:
    - ${local.ol_ingress_host}
  tls:
    - secretName: proxy-oc-tls
      hosts:
        - ${local.ol_ingress_host}
  className: "${data.terraform_remote_state.ingress.outputs.ingress_class_name}"
  annotations:
    external-dns.alpha.kubernetes.io/hostname: ${local.ol_ingress_host}.
    cert-manager.io/cluster-issuer: ${data.terraform_remote_state.certs.outputs.letsencrypt_cluster_issuer_prod}
    nginx.ingress.kubernetes.io/force-ssl-redirect: "true"
    nginx.ingress.kubernetes.io/proxy-body-size: "1024m"
    nginx.ingress.kubernetes.io/enable-cors: "true"
    nginx.ingress.kubernetes.io/cors-allow-methods: "*"
    nginx.ingress.kubernetes.io/cors-allow-origin: "${local.cors_allow_urls}"
    nginx.ingress.kubernetes.io/cors-allow-credentials: "true"
    nginx.ingress.kubernetes.io/limit-rps: "5"
    nginx.ingress.kubernetes.io/configuration-snippet: |
        more_clear_headers "Server";
        more_clear_headers "X-Powered-By";
        more_set_headers "X-Frame-Options SAMEORIGIN";
        more_set_headers "X-Xss-Protection: 1; mode=block";
        more_set_headers "X-Content-Type-Options: nosniff";
        more_set_headers "X-Permitted-Cross-Domain-Policies: none";
        more_set_headers "Referrer-Policy: no-referrer";
The configuration sets up the DNS entries for the public domain with external DNS annotation. The TLS certificate issuer is configured with the cert-manager annotation. Additionally, we have some basic security configurations with the request limit on the endpoint and adjustment of the HTTP headers.
Here is the Ollama Ingress configuration:
ingress:
  enabled: ${var.enable_ingress}
  className: "${data.terraform_remote_state.ingress.outputs.ingress_class_name}"
  annotations:
    "nginx.ingress.kubernetes.io/proxy-buffer-size": "128k"
    "external-dns.alpha.kubernetes.io/hostname": "${var.ollama_domain}."
    "cert-manager.io/cluster-issuer": ${data.terraform_remote_state.certs.outputs.letsencrypt_cluster_issuer_prod}
    "nginx.ingress.kubernetes.io/limit-rps": "100"
    "nginx.ingress.kubernetes.io/enable-cors": "true"
    "nginx.ingress.kubernetes.io/cors-allow-methods": "*"
    "nginx.ingress.kubernetes.io/cors-allow-origin": "https://${var.ollama_domain}"
    "nginx.ingress.kubernetes.io/cors-allow-credentials": "true"
    "nginx.ingress.kubernetes.io/auth-response-headers": Authorization
    "nginx.ingress.kubernetes.io/auth-url": "https://$host/${(local.oauth2_proxy_url_prefix_oc != null ? local.oauth2_proxy_url_prefix_oc : "")}/auth"
    "nginx.ingress.kubernetes.io/auth-signin": "https://$host/${(local.oauth2_proxy_url_prefix_oc != null ? local.oauth2_proxy_url_prefix_oc : "")}/start?rd=$escaped_request_uri"
    "nginx.ingress.kubernetes.io/configuration-snippet": |
        auth_request_set $oauth_upstream_1 $upstream_cookie_${(local.oauth2_proxy_cookie_name_ocs != null ? local.oauth2_proxy_cookie_name_ocs : "")}_1;
        access_by_lua_block {
              if ngx.var.oauth_upstream_1 ~= "" then
                ngx.header["Set-Cookie"] = "${(local.oauth2_proxy_cookie_name_ocs != null ? local.oauth2_proxy_cookie_name_ocs : "")}_1=" .. ngx.var.oauth_upstream_1 .. ngx.var.auth_cookie:match("(; .*)")
              end
            }
        more_clear_headers "Server";
        more_clear_headers "X-Powered-By";
        more_set_headers "X-Frame-Options SAMEORIGIN";
        more_set_headers "X-Xss-Protection: 1; mode=block";
        more_set_headers "X-Content-Type-Options: nosniff";
        more_set_headers "X-Permitted-Cross-Domain-Policies: none";
        more_set_headers "Referrer-Policy: no-referrer";
        more_set_headers "Content-Security-Policy: img-src 'self' data:; font-src 'self' data:; script-src 'unsafe-inline' 'self'; style-src 'unsafe-inline' 'self'; default-src https://${var.ollama_domain}";
        more_set_headers "Permissions-Policy: accelerometer=(),autoplay=(),camera=(),display-capture=(),document-domain=(),encrypted-media=(),fullscreen=(),geolocation=(),gyroscope=(),magnetometer=(),microphone=(),midi=(),payment=(),picture-in-picture=(),publickey-credentials-get=(),screen-wake-lock=(),sync-xhr=(self),usb=(),web-share=(self),xr-spatial-tracking=()";
  hosts:
    - host: ${var.ollama_domain}
      paths:
        - path: /
          pathType: Prefix
  tls:
    - secretName: ollama-kps-tls
      hosts:
        - ${var.ollama_domain}
This configuration is similar to the OAuth2 Proxy with external DNS and cert-manager, and we also have an additional request authorization configuration. Here’s a breakdown of the request authorization annotation:
"nginx.ingress.kubernetes.io/auth-response-headers": "Authorization"
This annotation instructs the NGINX Ingress Controller to pass the Authorization header from the authentication backend (OAuth2 Proxy) to the upstream service (Ollama).
"nginx.ingress.kubernetes.io/auth-url": "https://$host/${(local.oauth2_proxy_url_prefix_oc != null ? local.oauth2_proxy_url_prefix_oc : "")}/auth"
This annotation defines the URL that NGINX will use to send authentication requests. When a user tries to access the Ollama service, NGINX checks whether the user is authenticated by requesting this auth-url. The $host variable is dynamically replaced with the host from the incoming request, and ${(local.oauth2_proxy_url_prefix_oc != null ? local.oauth2_proxy_url_prefix_oc : “”)} determines whether there is an OAuth2 Proxy URL prefix.
"nginx.ingress.kubernetes.io/auth-signin": "https://$host/${(local.oauth2_proxy_url_prefix_oc != null ? local.oauth2_proxy_url_prefix_oc : "")}/start?rd=$escaped_request_uri"
This annotation defines the URL that NGINX will redirect users to if they are not authenticated. The $escaped_request_uri is the current URL the user tries to access, which NGINX encodes and appends as the rd(redirect) parameter. This ensures that once the user completes the authentication process, they are returned to the originally requested URL.
auth_request_set $oauth_upstream_1 $upstream_cookie_${(local.oauth2_proxy_cookie_name_ocs != null ? local.oauth2_proxy_cookie_name_ocs : "")}_1;
This directive sets the value of $oauth_upstream_1 to the value of the upstream cookie. The upstream cookie name is dynamically generated based on the value of local.oauth2_proxy_cookie_name_ocs. If a cookie name is defined, it is used to find the upstream cookie containing authentication information.
access_by_lua_block { ... }
This section allows you to run Lua code during the request access phase. The Lua block checks whether the $oauth_upstream_1 variable (set earlier) is non-empty, meaning there is a valid upstream cookie.
if ngx.var.oauth_upstream_1 ~= "" then
This condition checks if the $oauth_upstream_1 variable contains a value (i.e., the user is authenticated). If the condition is true, the Lua code continues.
ngx.header["Set-Cookie"] = "${(local.oauth2_proxy_cookie_name_ocs != null ? local.oauth2_proxy_cookie_name_ocs : "")}_1=" .. ngx.var.oauth_upstream_1 .. ngx.var.auth_cookie:match("(; .*)")
This line constructs the Set-Cookie header to set the authentication cookie for the response. The cookie name is dynamically generated based on local.oauth2_proxy_cookie_name_ocs. The cookie value is set to $oauth_upstream_1, which contains the value of the OAuth cookie. The ngx.var.auth_cookie:match(“(; .*)”) part appends any additional cookie attributes (such as the path, domain, or expiration) from the original auth_cookie.
Use Case 1: Accessing Ollama via Notebook on Ingress
Jupyter Notebook is an excellent tool for prototyping and experimenting with different models and workflows. In this use case, we have developed a Jupyter Notebook that allows users to access Ollama models through the Kubernetes ingress controller. To streamline the authentication process, we integrated Selenium, a browser automation tool that handles the login flow.
def get_kubert_oauth_cookie(kubert_ollama_url, kubert_cookie, wait_time=600):
    """
    Automates the login process to retrieve the '_kubert_oauth' cookie.
    Args:
        kubert_ollama_url (str): The URL to navigate to for logging in.
        kubert_cookie (str): The name of the secure cookie
        wait_time (int): Maximum time for the login to complete and the cookie to appear (in seconds).
    Returns:
        str: The cookie value.
    Raises:
        Exception: If the login fails or the cookie is not retrieved.
    """
    # Step 1: Set up Selenium and Chrome WebDriver
    chrome_options = Options()
    chrome_options.add_argument("--no-sandbox")
    chrome_options.add_argument("--disable-dev-shm-usage")

    service = Service(ChromeDriverManager().install())
    driver = webdriver.Chrome(service=service, options=chrome_options)
    try:
        # Step 2: Navigate to the login URL
        logging.info(f"Navigating to {kubert_ollama_url}...")
        driver.get(kubert_ollama_url)
        # Step 3: Wait until the "Ollama is running" text appears
        logging.info("Please complete the login process in the browser window...")
        try:
            WebDriverWait(driver, wait_time).until(  # Wait up to the specified wait_time
                lambda d: "Ollama is running" in d.page_source
            )
            logging.info("Login successful, 'Ollama is running' text found.")
        except TimeoutException:
            logging.error("Login timed out. 'Ollama is running' text not found.")
            raise Exception("Login process failed or took too long.")
        # Step 4: Capture cookies after login
        cookies = driver.get_cookies()
        # Find the specific cookie by name
        kubert_oauth_cookie = None
        for cookie in cookies:
            if cookie['name'] == cookie_name:
                kubert_oauth_cookie = cookie['value']
                break
        if kubert_oauth_cookie:
            logging.info("Kubert OAuth Cookie retrieved successfully.")
            return kubert_oauth_cookie
        else:
            logging.error("Failed to retrieve Kubert OAuth cookie.")
            raise Exception("Kubert OAuth cookie was not found after login.")
    finally:
        # Step 5: Close the browser window
        driver.quit()
When the user runs the function, Selenium launches a browser and directs the user to the authentication page, allowing them to log in securely. Once authenticated, Selenium captures the login cookie, which is used to authenticate subsequent requests to the Ollama service.
# Initiate the login process and retrieve the cookie
cookie = get_kubert_oauth_cookie(ollama_url, cookie_name, wait_time=600)
# Headers for Ollama
ollama_headers = {
    "Cookie": f"{cookie_name}={cookie}"
}
This cookie is critical for creating an Ollama client interacting with the deployed models. It ensures the user has the necessary permissions to securely access and use the models.
# Choose the Ollama model to use, assuming that it was pulled.
model="llama3.1:8b"
# Create the Ollama client
ollama_kubert = Ollama(
    base_url=ollama_url,
    headers=ollama_headers,
    model=model
)
Once we have the client, we can start interacting with the models.
response = ollama_kubert.invoke("What is Kubernetes?")
print(response)

Kubernetes (also known as K8s) is an open-source container orchestration system for automating the deployment, scaling, and management of containerized applications. It was originally designed by Google, and is now maintained by the Cloud Native Computing Foundation (CNCF).

Kubernetes provides a framework for deploying, managing, and scaling distributed systems, which are composed of multiple containers that run on top of a Linux operating system. The key components of Kubernetes include:
**Pods**: The basic execution unit in Kubernetes, which is a logical host for one or more containers.
**Replication Controllers** (or **ReplicaSets**): Ensure that a specified number of replicas of a pod are running at any given time.
**Services**: Provide a network identity and load-balancing for accessing applications in a cluster.
**Persistent Volumes** (PVs) and **Persistent Volume Claims** (PVCs): Allow storage resources to be requested by users and provisioned by administrators.
**Deployments**: Manage the rollout of new versions of an application, and provide a way to perform rollbacks if
The main goals of Kubernetes are:
**Self-healing**: automatically detect and replace failing pods
**Scalability**: scale up or down based on demand
**High availability**: ensure that applications remain accessible even in the event of failures or maintenance activities
Kubernetes provides a wide range of features, including:
* Automated rollouts and rollbacks
* Resource management (CPU, memory, etc.)
* Self-healing and self-scaling
* Load balancing and traffic routing
* Persistent storage management
* Security and authentication mechanisms
* Integration with other tools and platforms (e.g., Docker, Prometheus, Grafana)

Kubernetes has become the de facto standard for deploying containerized applications in production environments, and is widely adopted by organizations of all sizes.
Here's a simple analogy to help illustrate the concept:
Imagine you have a small restaurant that serves food in containers. You want to make sure that:
* The right number of cooks (containers) are working at any given time.
* If one cook leaves or breaks down, another takes their place immediately.
* There's always enough space on the kitchen counter for all the dishes (persistent storage).
* Customers can order food without worrying about the restaurant being full or empty.

Kubernetes is like a smart system that automates these tasks for you, so you can focus on running your business!
This setup simplifies the authentication process, allowing users to focus on experimenting with the models in an interactive environment while still maintaining strong security controls.
Use Case 2: DevSpace with LangChain and FastAPI for Ollama Access
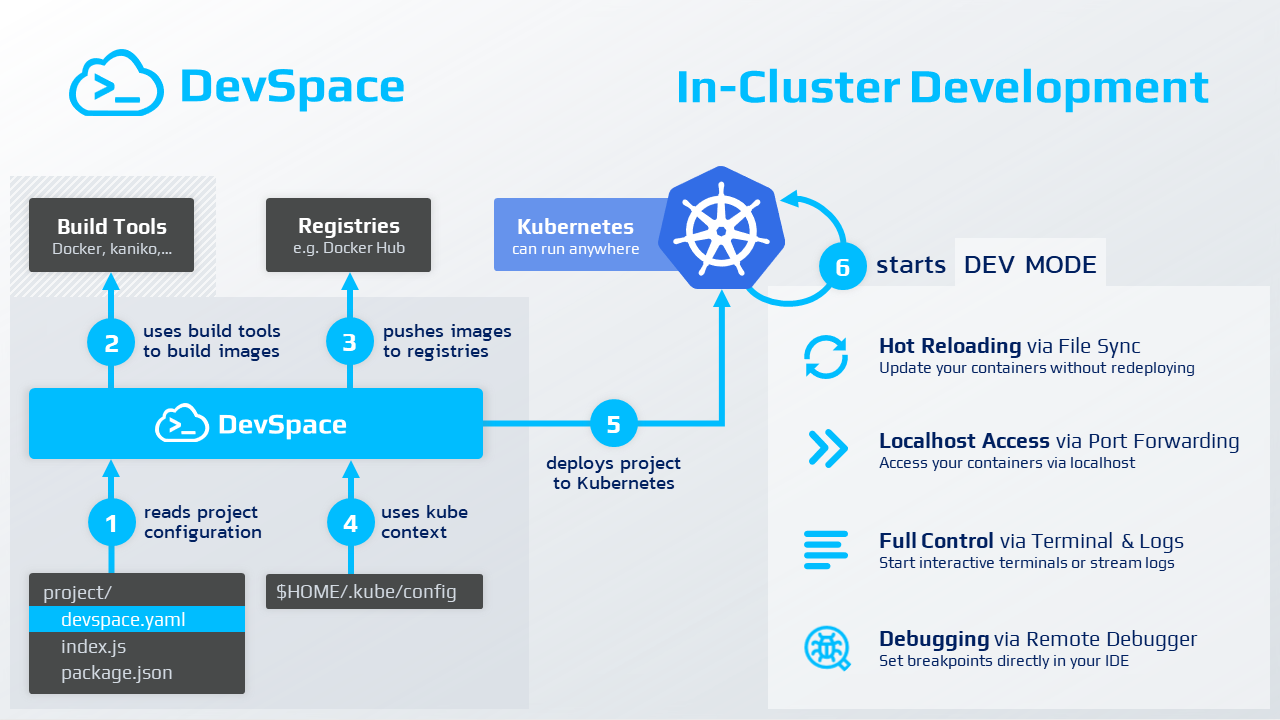
DevSpace streamlines development by allowing developers to work locally while deploying and debugging applications directly in Kubernetes clusters. It enables real-time syncing of code changes without the need to rebuild images or redeploy pods, making it perfect for efficient Ollama model access and rapid AI development.
https://www.devspace.sh/docs/getting-started/introduction
DevSpace is an open-source tool that helps developers build, deploy, and debug applications directly in Kubernetes clusters. It streamlines the development process by allowing developers to work with their applications as if running locally while seamlessly interacting with Kubernetes. DevSpace facilitates faster iteration by syncing code changes to the cluster in real-time, enabling developers to test changes without needing to rebuild images or redeploy pods.
In this use case, we have built a Python project that leverages DevSpace for deployment to the Kubernetes cluster. Instead of using the ingress controller, this project accesses Ollama directly via a Kubernetes service, allowing for internal communication within the cluster. The project utilizes the LangChain framework, a popular tool for working with language models, to interact with Ollama’s large language models.
DevSpace simplifies Kubernetes-based development and following devspace.yaml configuration details how to build, deploy, and sync the development environment in the Kubernetes cluster.
version: v2beta1
name: agent-prompts
vars:
  # Kubert private Docker registry
  IMAGE-DEV: northamerica-northeast2-docker.pkg.dev/tcinc-dev/tc-tekstack-kps-na-ne2-docker-images/agent/prompts-devspace
images:
  dev-optimized:
    image: ${IMAGE-DEV}
    dockerfile: ./Dockerfile.dev
    context: ./
    buildArgs:
      PYTHON_VERSION: "3.12.5-slim-bullseye"
    rebuildStrategy: ignoreContextChanges
    buildKit:
      args: ["--platform", "linux/amd64,linux/arm64"]
localRegistry:
  enabled: false
deployments:
  agent-prompts:
    updateImageTags: true
    kubectl:
      manifests:
        - manifests/deployment.yaml
dev:
  agent-prompts:
    # Search for the container that runs this image
    imageSelector: will-be-replaced-with-dev-image
    # Replace the container image with this dev-optimized image (allows to skip image building during development)
    devImage: ${IMAGE-DEV}
    # Sync files between the local filesystem and the development container
    sync:
      - path: ./:/app
    # Open a terminal and use the following command to start it
    terminal:
      command: ./devspace_start.sh
    # Inject a lightweight SSH server into the container (so your IDE can connect to the remote dev env)
    ssh:
      enabled: true
      localHostname: kubert.devspace
    # Make the following commands from my local machine available inside the dev container
    proxyCommands:
      - command: devspace
      - command: kubectl
      - gitCredentials: true
    # Forward the following ports to be able access your application via localhost
    ports:
      - port: "3000:3000"
In the vars section in the file, we define the IMAGE-DEV variable, which stores the location of the Docker image in the Kubert private Docker registry. This allows for a dynamic reference to the development image throughout the file. In the images section, we configure how the development image is built. The dev-optimized image is linked to the Dockerfile and uses the local context to build the image. Furthermore, the rebuildStrategy is set to ignore context changes, preventing unnecessary rebuilds during development and speeding up the workflow by only rebuilding the image when necessary. The dev section is where the magic of DevSpace shines. Here, we specify how DevSpace handles the development environment. First, the imageSelector identifies the container image that will be replaced with the development image. The sync configuration enables real-time synchronization between the local filesystem and the container, ensuring that any changes made locally are immediately reflected inside the container, making the feedback loop faster. Lastly, the proxyCommands section forwards necessary commands like devspace and kubectl from the local machine to the container so the developer can run cluster-related operations without leaving the dev environment. The ports section forwards port 3000, enabling local access to the application for testing through localhost:3000.
The full project is in the git repository, and it is worth mentioning the main FastAPI module in ollama/devspace/src/prompts/__init__.py file. Here, we follow the standard create application function design pattern for the FasAPI application.
def setup_route_integration(fast_api: FastAPI, settings: Settings):
    """
    Set up the integration of external services, such as AI models, with FastAPI routes.
    This function integrates the ChatOllama model and adds the related routes under the "/ollama" path.
    Args:
        fast_api (FastAPI): The FastAPI application instance.
        settings (Settings): The application settings that contain configuration details.
    """
    # Create a ChatOllama model instance
    model = ChatOllama(model=settings.ollama_model, base_url=settings.ollama_url)
    # Add routes for the ChatOllama model to the FastAPI app at the "/ollama" path
    add_routes(
        fast_api,
        model,
        path="/ollama",
    )
We added an Ollama route to integrate the Ollama service with FastAPI. The LangServer also adds the playground route to that route.
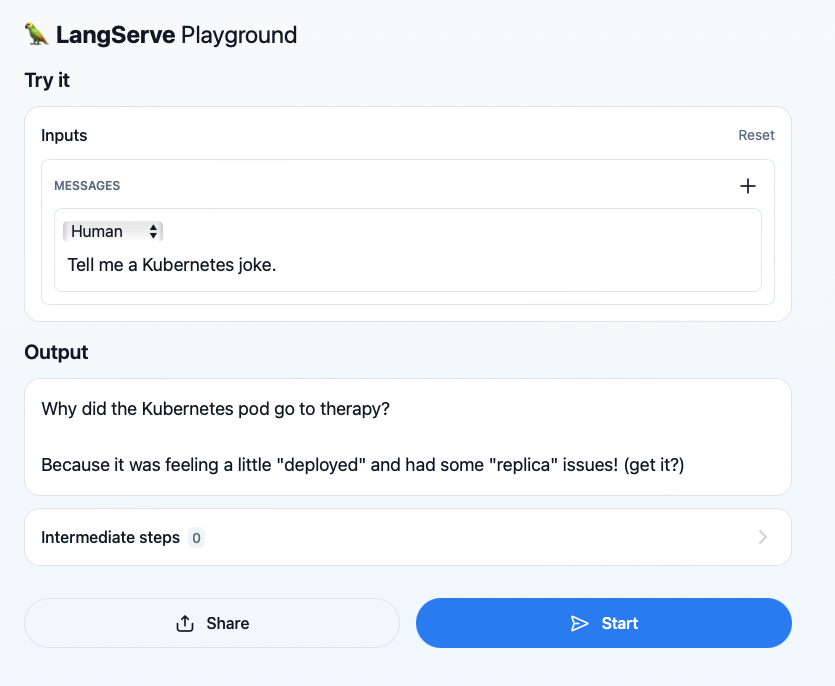
We added an Ollama route to integrate the Ollama service with FastAPI. The LangServer also includes a playground route, allowing seamless interaction and testing of Ollama models within the FastAPI framework.
Using DevSpace, developers can work on the application locally while it runs inside the Kubernetes cluster, offering a development experience that closely mirrors production. The LangChain framework simplifies the interaction with Ollama, providing powerful tools for integrating language models into the application. This setup demonstrates how developers can efficiently build, test, and deploy sophisticated AI-driven applications within a Kubernetes environment using modern tools like DevSpace and LangChain.
Conclusion
Deploying Ollama on Kubernetes offers a robust and scalable solution for running large language models efficiently and securely. You can optimize performance by leveraging GPU node pools while controlling costs through autoscaling and GPU sharing. Terraform and Terragrunt’s flexibility ensures easy, repeatable deployments, while OAuth2 Proxy and Keycloak provide a robust security layer that integrates seamlessly into your Kubernetes cluster.
For developers, the notebook access via ingress allows quick prototyping, while the DevSpace setup provides a development environment that mirrors production, enabling efficient application building and testing. With tools like LangChain and FastAPI, integrating AI models into applications has never been easier.
Following this guide and the code in the repository, you can deploy your Ollama instance cost-effectively and securely, empowering your AI-driven applications. Explore the code repository and start deploying Ollama in your Kubernetes cluster today!
